LED Control
Advanced WS2812/SK6812 RGB/RGBW LED controller with on-the-fly Python animation programming, web code editor/control interface, 1D, 2D, and 3D display support, and E1.31 sACN support
View on GitHubLED Control
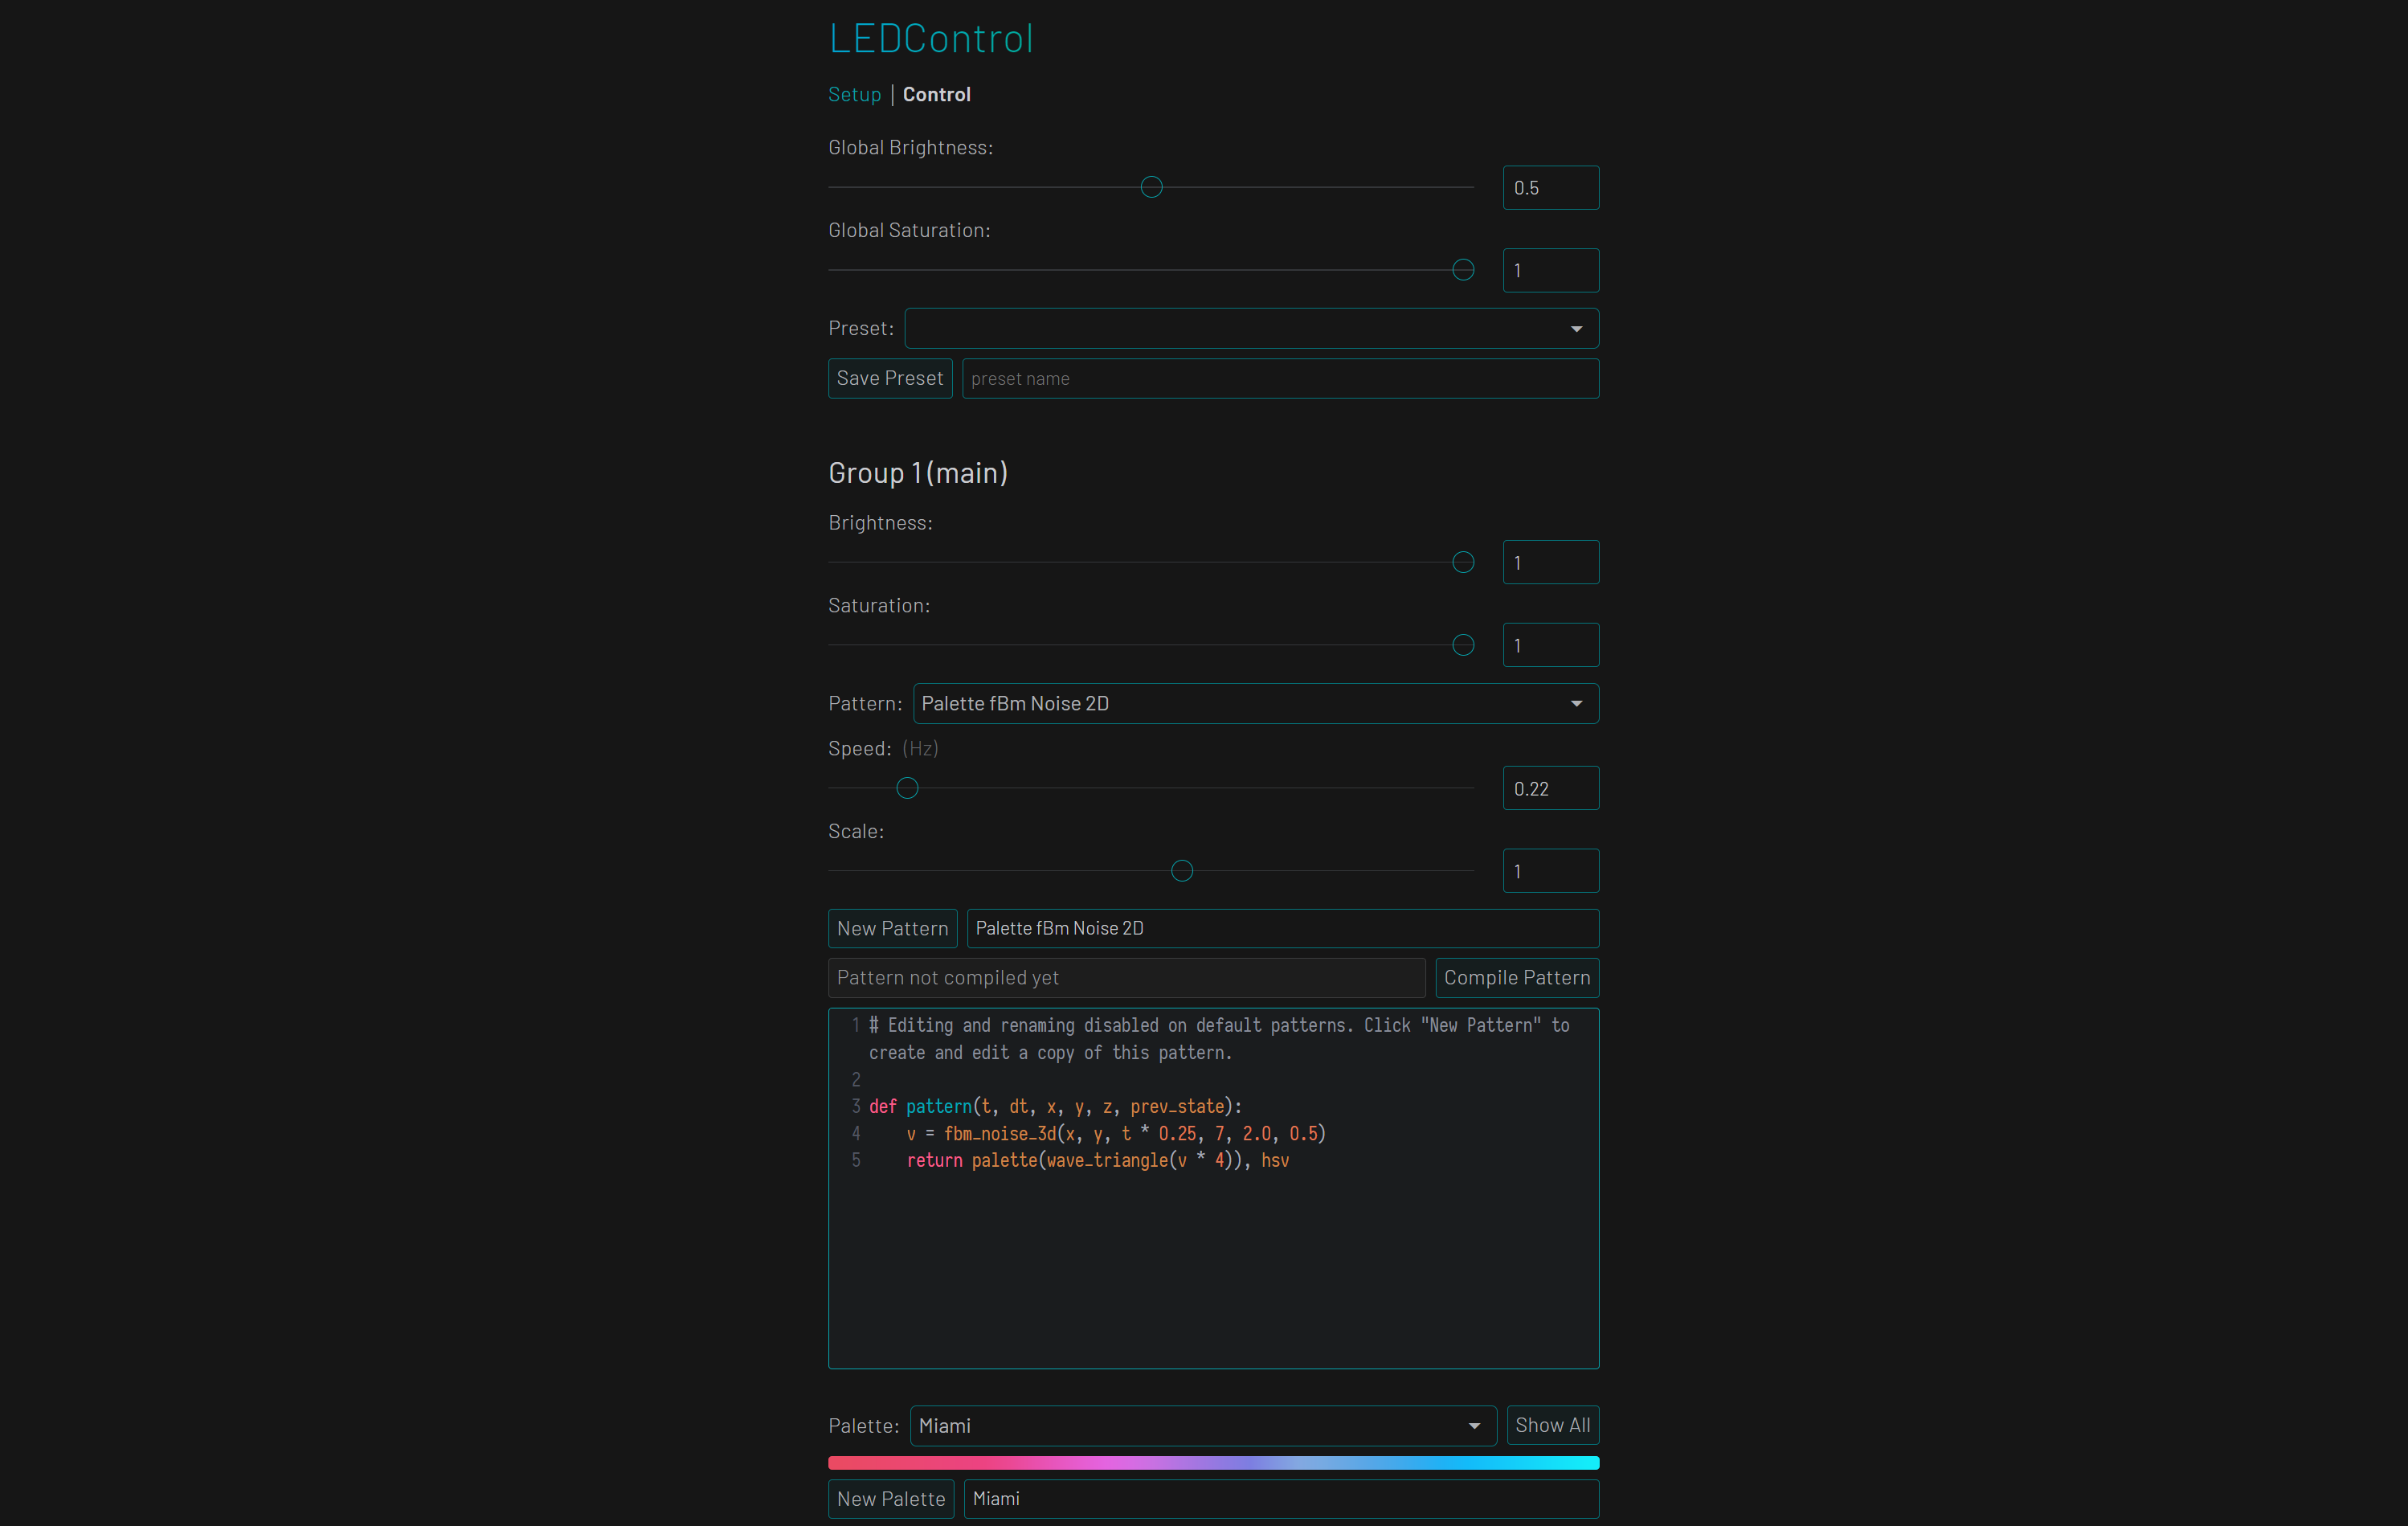
Features
- Lightweight responsive web interface works on both desktop and mobile devices
- In-browser code editor and color palette editor make creating and modifying animations easy
- Large selection of built-in animations and color palettes means you don’t have to write any code
- Works with cheap and readily available WS281x and SK6812 LED strips and strings
- Runs on a Raspberry Pi single-board computer directly connected to LEDs, and on any other computer with the help of a low-cost microcontroller board (Raspberry Pi Pico) connected via USB
- Supports pixel mapping for arbitrary 2D and 3D LED arrangements
- Seamlessly supports HSV-to-RGBW and RGB-to-RGBW conversion for RGBW LED strips
- Supports networked E1.31 sACN DMX control for music visualization through LedFx
Technical Details
- Animation patterns are defined as Python functions that work similarly to fragment shaders
- Capable of achieving up to 150 FPS on 150 RGBW LEDs on a Raspberry Pi Zero
- Web backend and animation code are written in Python using the Flask web framework for ease of development and served using bjoern
- Web frontend UI is implenented using Vue 3
- Color conversions, color correction, and final rendering operations are implemented in a C extension module for maximum performance
Framerate Note
The theoretical maximum framerate for 150 RGBW LEDs is 800000 Hz / (8*4) bits / 150 = 166.67 FPS. All built-in animations run at over 50FPS with 150 LEDs on a Raspberry Pi Zero, the least powerful Raspberry Pi model. The framerate is limited to 60FPS by default to reduce CPU usage.
Install
Hardware Setup (All Platforms)
Obtain a WS2812B or SK6812B LED strip (SK6812 RGB/White LEDs are highly recommended) and a suitable 5V power supply. USB power may be suitable, and an external power supply may not be needed, when using small numbers of LEDs (less than 100 RGBW or 50 RGB LEDs).
Hardware Setup (External LED Driver)
- Obtain a Raspberry Pi Pico (US$4) or any microcontroller board based on the RP2040 chip.
- Connect the LED strip to your microcontroller:
- MCU GND to LED GND
- MCU GPIO12 to LED Data in
- Power supply ground to LED GND
- Power supply 5V to LED 5V (Important: use the VBUS pin, not VSYS, to power LEDs from USB on Raspberry Pi Pico and Pico W boards)
Any GPIO pin can be used instead of GPIO12 if the definition in firmware/config.h is changed appropriately.
Hardware Setup (Raspberry Pi)
- Obtain a Raspberry Pi single-board computer (any model). Due to the unavailability of Raspberry Pis, using any other computer with an external LED driver is recommended (see above).
- Connect the LED strip to your Raspberry Pi:
- Pi GND to LED GND
- Pi GPIO18 to LED Data in
- Power supply ground to LED GND
- Power supply 5V to LED 5V
For more information on which Raspberry Pi GPIO pins LED strips can be connected to, see here.
RGBW LEDs Are Highly Recommended
Know what you’re doing with electricity. Addressable LEDs can draw a lot of current, especially in long strips. You should use RGBW LEDs for the reason that they look better and require much less power when displaying whiter colors (a good quality 5V 4A power supply can comfortably handle 150 RGBW LEDs at full brightness).
For large installations, each group of up to ~200 LEDs should be connected to the power supply with its own adequately sized wires. Don’t expect to get good or safe results by daisy chaining strips together. Furthermore, when using a high current (20+A) power supply, a short circuit somewhere along the LED strip will likely not draw enough current to trip your power supply’s over-current protection due to the resistance of the flexible PCB. This is a serious fire hazard, so each individually powered group of LEDs should be protected with its own fuse or circuit breaker rated to ideally no more than 10A. See this guide for good information on powering hundreds or thousands of LEDs.
Addressable LED strips usually come with seriously undersized power wires and barrel jacks or JST SM connectors rated for only 3A, and it would be a good idea to replace these appropriately.
For more information on using a level shifter, which may be necessary with some WS2812 RGB LED strips, see this Adafruit guide.
If You Really Want To Use RGB LEDs
You should budget at least 50mA for each LED at full brightness, which means 7.5A for 150 LEDs (5 meters of 30 LED/m strip, 2.5m of 60LED/m strip…). In practice, your LED strips won’t draw this much current, but your power supply should be capable of handling it.
The flexible PCBs and connectors used in these LED strips are not really designed to handle these currents, and begin to heat up when passing as little as 2-3A. Again, each group of up to ~150 LEDs should be powered through its own adequately sized wires.
Software Setup (With Pi Pico LED Driver)
Python 3.7 or newer is required.
- Ensure that git, python, pip, and the Raspberry Pi Pico SDK are installed.
git clone https://github.com/jackw01/led-control.gitcd led-controlgit checkout tags/v2.1.1python setup.py develop- Modify
firmware/config.hwith the correct parameters for your hardware setup. - Following instructions in the Raspberry Pi Pico SDK documentation, build the firmware (located in the
firmwarefolder). - Flash the firmware onto your microcontroller board: hold down the BOOTSEL button when connecting it to your computer with a USB cable and it should enumerate as a USB storage device. Drag and drop or copy and paste the
.uf2binary file inbuild/firmwareinto the microcontroller. - Determine the serial port ID of your microcontroller. On Windows, this can be done through Device Manager.
ledcontrol --led_count NUMBER_OF_LEDS_HERE --serial_port SERIAL_PORT_HERE(add--led_pixel_order GRBWif using RGBW LEDs)
Software Setup (Raspberry Pi)
Python 3.7 or newer is required.
sudo apt-get install scons swig libev-dev python3-dev python3-setuptools git python3-pipgit clone --recurse-submodules https://github.com/jackw01/led-control.gitcd led-controlgit checkout tags/v2.1.1sudo python3 setup.py developsudo ledcontrol --led_count NUMBER_OF_LEDS_HERE(add--led_pixel_order GRBWif using RGBW LEDs)
Common Issues
LEDControl and the Raspberry Pi audio subsystem cannot be use together since they both use the PWM hardware. On some Linux distributions, you must disable the audio kernel module by commenting out the line dtparam=audio=on in /boot/config.txt or by creating a file /etc/modprobe.d/snd-blacklist.conf with the contents blacklist snd_bcm2835.
Command Line Configuration Arguments
Web server and LED hardware parameters must be specified as command line arguments when running ledcontrol. Note that none of the LED hardware-related arguments will have an effect when using a Pi Pico to drive the LEDs.
usage: ledcontrol [-h] [--port PORT] [--host HOST] [--led_count LED_COUNT]
                  [--config_file CONFIG_FILE]
                  [--pixel_mapping_json PIXEL_MAPPING_JSON] [--fps FPS]
                  [--led_pin LED_PIN] [--led_data_rate LED_DATA_RATE]
                  [--led_dma_channel LED_DMA_CHANNEL]
                  [--led_pixel_order LED_PIXEL_ORDER]
                  [--led_brightness_limit LED_BRIGHTNESS_LIMIT]
                  [--save_interval SAVE_INTERVAL] [--sacn] [--hap] [--no_timer_reset]
                  [--dev] [--serial_port SERIAL_PORT]

optional arguments:
  -h, --help            show this help message and exit
  --port PORT           Port to use for web interface. Default: 80
  --host HOST           Hostname to use for web interface. Default: 0.0.0.0
  --led_count LED_COUNT
                        Number of LEDs
  --config_file CONFIG_FILE
                        Location of config file. Default: /etc/ledcontrol.json
  --pixel_mapping_json PIXEL_MAPPING_JSON
                        JSON file containing pixel mapping (see README)
  --fps FPS             Refresh rate limit for LEDs, in FPS. Default: 60
  --led_pin LED_PIN     Pin for LEDs (see
                        https://github.com/jgarff/rpi_ws281x). Default: 18
  --led_data_rate LED_DATA_RATE
                        Data rate for LEDs. Default: 800000 Hz
  --led_dma_channel LED_DMA_CHANNEL
                        DMA channel for LEDs. DO NOT USE CHANNEL 5 ON Pi 3 B.
                        Default: 10
  --led_pixel_order LED_PIXEL_ORDER
                        LED color channel order. Any combination of RGB with
                        or without a W at the end. Default: GRB, try GRBW for
                        SK6812
  --led_brightness_limit LED_BRIGHTNESS_LIMIT
                        LED maximum brightness limit for the web UI. Float
                        from 0.0-1.0. Default: 1.0
  --save_interval SAVE_INTERVAL
                        Interval for automatically saving settings in seconds.
                        Default: 60
  --sacn                Enable sACN / E1.31 support. Default: False
  --hap                 Enable HomeKit Accessory Protocol support. Default: False
  --no_timer_reset      Do not reset the animation timer when patterns are
                        changed. Default: False
  --dev                 Development flag. Default: False
  --serial_port SERIAL_PORT
                        Serial port for external LED driver.
Color Correction
By default, the color correction values on the web interface are set to (255, 190, 170) which is a good starting point for SK6812 RGBW LEDs, but not all LEDs are the same. You should adjust these values as well as the global color temperature while using the “Test Color Correction” feature, which displays the white point of the RGB subpixels in your LEDs, even if you are using RGBW LEDs.
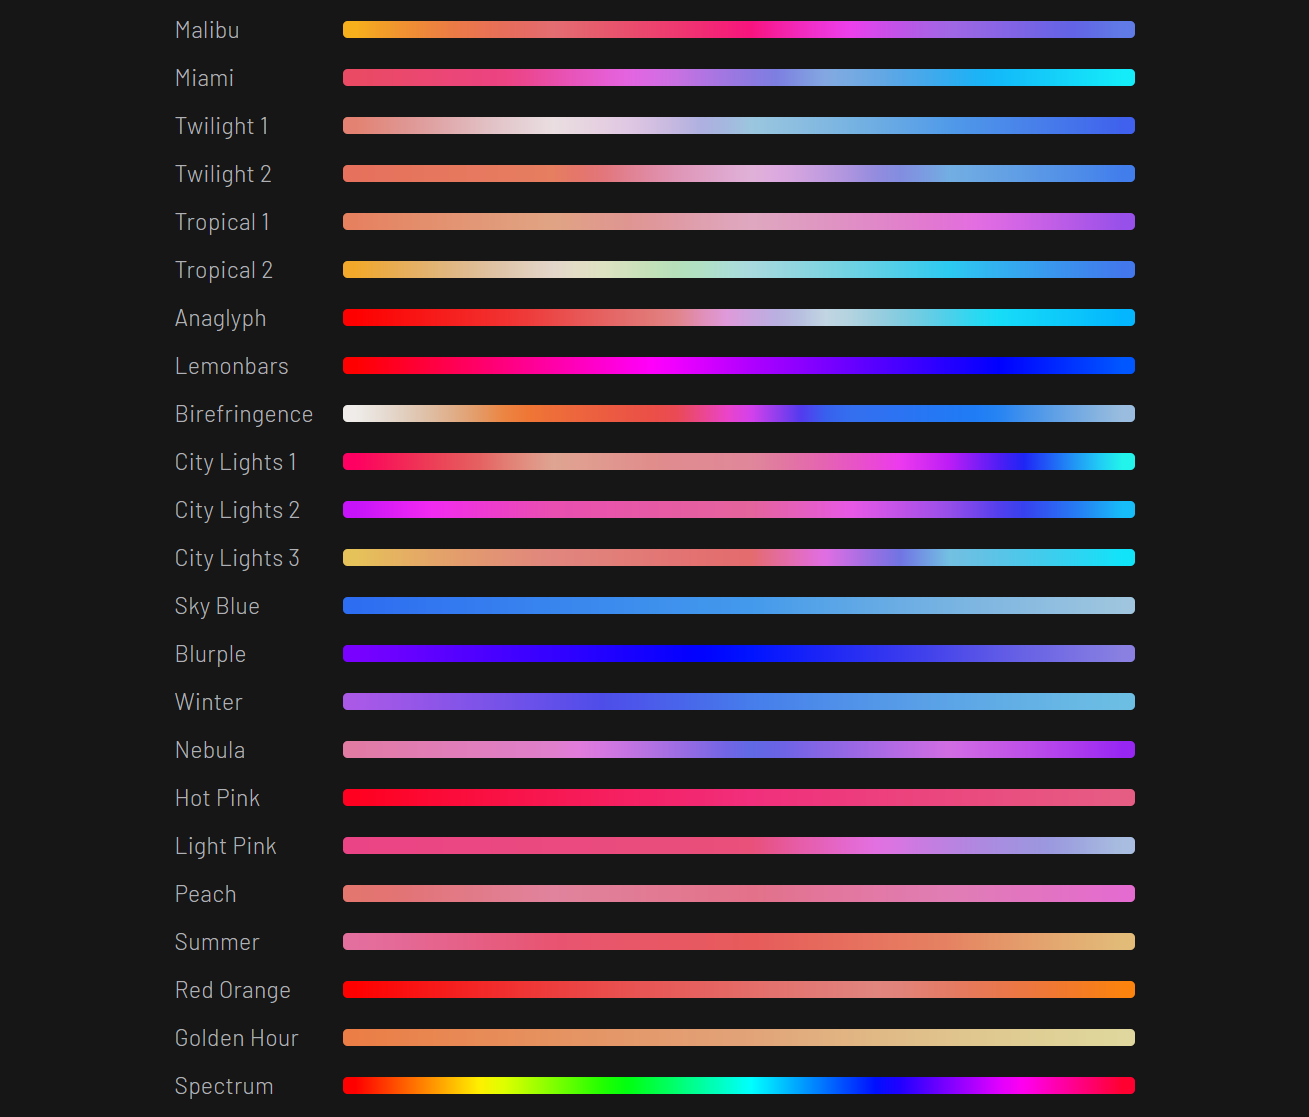
Built-In Color Palettes
Built-In Animation Patterns
Animated GIF previews of all built-in animations can be seen at animations.md.
E1.31 sACN, Music Visualization, and LedFx Use
LEDControl can function as a E1.31 streaming ACN receiver, allowing the connected LEDs to be directly controlled over the network. LedFx is recommended for music visualization over sACN.
- Follow the instructions to install LedFx and set up your computer’s audio output.
- Add your LEDControl device in LedFx: Select
e131as the device type, use the hostname or IP of your Raspberry Pi, and enter the number of LEDs you have attached. - Run LEDControl with the
--sacncommand line flag. An option to enable sACN receiver mode will appear on the web interface. - Enable sACN receiver mode in the LEDControl web interface.
- Configure a music visualizer effect in LedFx.
While sACN receiver mode is enabled, the LED refresh rate is determined by your sACN server. There may be noticeable latency when using sACN on congested networks or if other software on the Raspberry Pi is using its network hardware; this is a known limitation of sACN.
HomeKit Accessory Protocol Support (Experimental)
The brightness and on/off state of LEDControl can be controlled through Apple HomeKit. Run LEDControl with the --hap command line flag and a setup code will be printed for manually pairing in the Apple Home app.
Pixel Mapping
LEDControl supports pixel mapping, which allows 2- and 3-dimensional animation patterns to be mapped to any physical arrangement of LEDs. Currently, pixel mappings can only be specified with a JSON file containing an array of points representing the positions of each LED, using the --pixel_mapping_json command line argument. --led_count does not need to be specified when pixel mapping is used. The points must be in the same order that the correresponding LEDs are connected, and the units used to define the pixel mapping do not matter (negative and floating-point values are allowed).
Example
![]()
[
  [-3, 3, 0],
  [0, 3, 0],
  [3, 3, 0],
  [3, 0, 0],
  [3, -3, 0],
  [0, -3, 0],
  [-3, -3, 0],
  [-3, 0, 0]
]
Animation Editing
Animation patterns are defined as Python functions that work similarly to GLSL fragment shaders or DirectX pixel shaders. The LEDControl web interface allows editing and creation of patterns using a subset of Python.
Patterns are compiled using RestrictedPython and run with a restricted set of builtin functions and global variables. This should prevent filesystem access and code execution, but the scripting system should not be considered completely secure and the web interface should not be exposed to untrusted users.
Pattern Function Guide
Each animation frame, the pattern function is called once per LED/pixel with time, position, and previous state as inputs to determine the next color of that pixel.
# cycle_hue_1d
def pattern(t, dt, x, y, z, prev_state):
    return (t + x, 1, 1), hsv
Arguments
t
Time in cycles (an arbitary unit that represents one animation cycle as a floating point number). Calculated by multiplying real time in seconds by animation speed in Hz (cycles/second). Time is reset to 0 every week (168 hours) of uptime to prevent any math/overflow issues that may occur. By default, time is also reset when the animation pattern is changed or recompiled, but this behavior can be changed with the --no_timer_reset command-line flag.
dt
Delta time in cycles.
x, y, z
Normalized (0 to 1) value representing the position of the current LED in arbitrary units (after mapping LED indices to positions and scaling). By default, LEDs are mapped to the x axis only. One position unit represents the scale factor multiplied by the length of the axis. At a scale of less than 1, one position unit represents a fraction of the axis length and the animation is tiled to fill all the LEDs.
prev_state
Previous color state of the current LED as an HSV or RGB tuple. Initialized to (0, 0, 0) when the program starts.
Return Values
Pattern functions must return a color in tuple form and either hsv or rgb depending on the format of the color. All values are expected to be in the 0 to 1 range, except for hue. Hue values less than 0 or greater than 1 will wrap. RGB values will be clamped to the 0 to 1 range.
Supported Python Globals
- Builtins:
None,False,True,abs,bool,callable,chr,complex,divmod,float,hash,hex,id,int,isinstance,issubclass,len,oct,ord,pow,range,repr,round,slice,str,tuple,zip - All functions and constants from the
mathmodule - All functions from the
randommodule
Color Palette Access
Color palettes are interpolated in the HSV color space. 1000 interpolated values are stored in a lookup table to allow for fast access to any color in the palette.
palette(t)
Returns the color from the current palette corresponding to a value t between 0 and 1. Values of t less than 0 or greater than 1 will wrap.
palette_mirrored(t)
Returns a color from a mirrored version of the current palette that wraps seamlessly. Functionally equivalent to palette(wave_triangle(t)), but performs just as well as palette(t).
Wave Functions
All waveforms have a period of 1 time unit, a range from 0 to 1, and a peak (f(t)=1) at t=0. When running on Raspberry Pi, optimized C implementations of these functions are used which gives a suprisingly significant performance improvement over Python.
wave_sine(t)
Returns the instantaneous value of a 1Hz sine wave at time t.
wave_cubic(t)
Returns the instantaneous value of a 1Hz sine wave approximated with cubic easing at time t. Appears to spend more time near 0 and 1 than a true sine wave.
wave_triangle(t)
Returns the instantaneous value of a 1Hz triangle wave at time t.
wave_pulse(t, duty_cycle)
Returns the instantaneous value of a 1Hz pulse wave of the specified duty cycle (range 0 to 1) at time t.
plasma_sines_octave(x, y, t, octaves, lacunarity, persistence)
Custom optimized “plasma” implementation that returns a sum of several octaves of sinusoid-based waveforms creating a non-random noise effect. Essentially fractal noise, but using sinusoid functions as a basis instead of pseudorandom noise. This creates more detailed and better looking plasma effects than simpler implementations. For each successive octave, the frequency (how fast the wave changes with space and time) is multiplied by lacunarity, and the amplitude is multiplied by persistence. octaves must be an integer. See the usage notes below.
plasma_sines(x, y, t, coeff_x, coeff_y, coeff_x_y, coeff_mag_xy)
Basic optimized function for creating RGB plasma animations (see https://www.bidouille.org/prog/plasma). Returns sin((x + t) * coeff_x) + sin((y + t) * coeff_y) + sin((x + y + t) * coeff_x_y) + sin((sqrt(x * x + y * y) + t) * coeff_mag_xy). Not recommended unless you want it, plasma_sines_octave generally looks better.
perlin_noise_3d(x, y, z)
Standard 3D perlin noise. Use time as one of the arguments to make the noise vary with time. Returns a value from 0 to 1.
fbm_noise_3d(x, y, z, octaves, lacunarity, persistence)
Standard 3D fBm (fractal Brownian motion) noise.
Additional Utility Functions
clamp(x, min, max)
Returns min if x < min and max if x > max, otherwise returns x.
fract(x)
Returns the floating point component of x (x - floor(x)).
impulse_exp(t)
Asymmetrical exponential “impulse” wave function f(t) = t * e^(1-t). Peaks at t=1.
blackbody_to_rgb(kelvin)
Returns a normalized RGB tuple for a color temperature in Kelvin.
blackbody_correction_rgb(rgb, kelvin)
Tints an RGB color (normalized RGB tuple) to a color temperature in Kelvin. Returns a normalized RGB tuple.
Using Plasma Utility Functions
plasma_sines and plasma_sines_octave both return the instantaneous value of a 2D periodic function at time t and position (x, y). The typical way of converting this value to a color is to assign the RGB values to expressions of the form a * wave_sine(b * x + c) + d, where wave_sine is a function that returns a sinusoid waveform with range 0 to 1. This is done in the code for several built in patterns.
Below is GLSL code for testing and experimenting with these plasma functions in 2D. This code can be easily run on Shadertoy.
plasma_sines
float wave_sine(float t) {
  return cos(6.283 * t) / 2.0 + 0.5;
}

float plasma_sines(float x, float y, float t,
                   float coeff_x, float coeff_y,
                   float coeff_x_y, float coeff_dist_xy) {
  float v = 0.0;
  v += sin((x + t) * coeff_x);
  v += sin((y + t) * coeff_y);
  v += sin((x + y + t) * coeff_x_y);
  v += sin((sqrt(x * x + y * y) + t) * coeff_dist_xy);
  return v;
}

void mainImage(out vec4 fragColor, in vec2 fragCoord) {
  // Normalized pixel coordinates (from 0 to 1)
  vec2 uv = fragCoord / iResolution.xy;

  float v = plasma_sines(uv.x, uv.y, iTime, 1.0, 0.5, 0.5, 1.0);

  float r = 0.8 - wave_sine(v);
  float g = wave_sine(v + 0.333) - 0.2;
  float b = 0.8 - wave_sine(v + 0.666);

  fragColor = vec4(r, g, b, 1.0);
}
plasma_sines_octave
float wave_sine(float t) {
  return cos(6.283 * t) / 2.0 + 0.5;
}

float plasma_sines_octave(float x, float y, float t,
                          int octaves,
                          float temporal_freq_persistence,
                          float amplitude_persistence) {
  float vx = x;
  float vy = y;
  float spatial_freq = 1.0;
  float temporal_freq = 1.0;
  float amplitude = 1.0;
  for (int i = 0; i < octaves; i++) {
    float vx1 = vx;
    vx += cos(vy * spatial_freq + t * temporal_freq) * amplitude;
    vy += sin(vx1 * spatial_freq + t * temporal_freq) * amplitude;
    spatial_freq *= 2.0;
    temporal_freq *= temporal_freq_persistence;
    amplitude *= amplitude_persistence;
  }
  return vx / 2.0;
}

void mainImage(out vec4 fragColor, in vec2 fragCoord) {
  // Normalized pixel coordinates (from 0 to 1)
  vec2 uv = fragCoord / iResolution.xy;

  float v = plasma_sines_octave(uv.x, uv.y, iTime, 8, 1.5, 0.5);

  float r = 0.8 - wave_sine(v);
  float g = wave_sine(v + 0.333) - 0.2;
  float b = 0.8 - wave_sine(v + 0.666);

  fragColor = vec4(r, g, b, 1.0);
}
Development
To build the C extension module (on Raspberry Pi single-board computers only):
swig -python ./ledcontrol/driver/ledcontrol_rpi_ws281x_driver.i && sudo python3 setup.py develop
License
MIT