pi tin
[a project by alley cat engineering - jackw01 and soaporsalad]the open source raspberry pi handheld retro gaming console
Buy a kit on Ko-fi Download STL files Download SD card imagePi Tin Software Setup
For convenience, we provide a SD card image based on RetroPie 4.8 with all required software installed and configured. This guide assumes you are using the prebuilt image. If not, full instructions for installing the required software on top of a clean install of RetroPie are here.
1. install the prebuilt image
Download the Pi Tin prebuilt image here (2GB zip file). Unzip and write the image to a 8GB or larger MicroSD card using Win32DiskImager, Raspberry Pi Imager, or Etcher.
2. set up wifi
After writing the SD card, eject and reinsert it to access the newly created boot partition.
Note: If using Windows, ignore any popups asking to “scan and fix” or format the SD card.
Create a file called wpa_supplicant.conf in the root directory of the boot partition with the contents below, replacing SSID and PASSWORD with your network name and password. You can add multiple networks by copying the network={} block. If you are outside of the United States, change country=US to your country’s ISO two-letter country code.
country=US
ctrl_interface=DIR=/var/run/wpa_supplicant GROUP=netdev
update_config=1

# RETROPIE CONFIG START
network={
    ssid="SSID"
    psk="PASSWORD"
}
# RETROPIE CONFIG END
Eject the SD card.
3. boot Raspberry Pi and verify functionality
With the display connected, insert the SD card, connect the USB-C cable, and press the power button to power up the Raspberry Pi. If the hardware build and software installation were done correctly, the display should show a black screen at power on, then within 1 minute display the RetroPie splash screen and the EmulationStation launcher. Hold the power button for about half a second and release it. The Raspberry Pi should safely shut down and the display should turn off completely. If the Raspberry Pi does not shut down, it is likely because one or more of the pads is not soldered properly.
4. connect via SSH and change password
The Raspberry Pi should automatically connect to your WiFi network within a minute after booting up and you should be able to log in via SSH using the default password raspberry (use ssh pi@retropie.local in the command line on any computer running Windows 10 or 11, Mac OS, or Linux).
We strongly recommend changing the user password since SSH and SMB are enabled. This can be done by running the passwd command on the Raspberry Pi via SSH.
You can also test audio at this point by running speaker-test -c2 on the Raspberry Pi. You should hear white noise from the speaker.
5. using RetroPie
Follow the RetroPie Getting Started guide to configure and test the gamepad buttons and load ROMs.
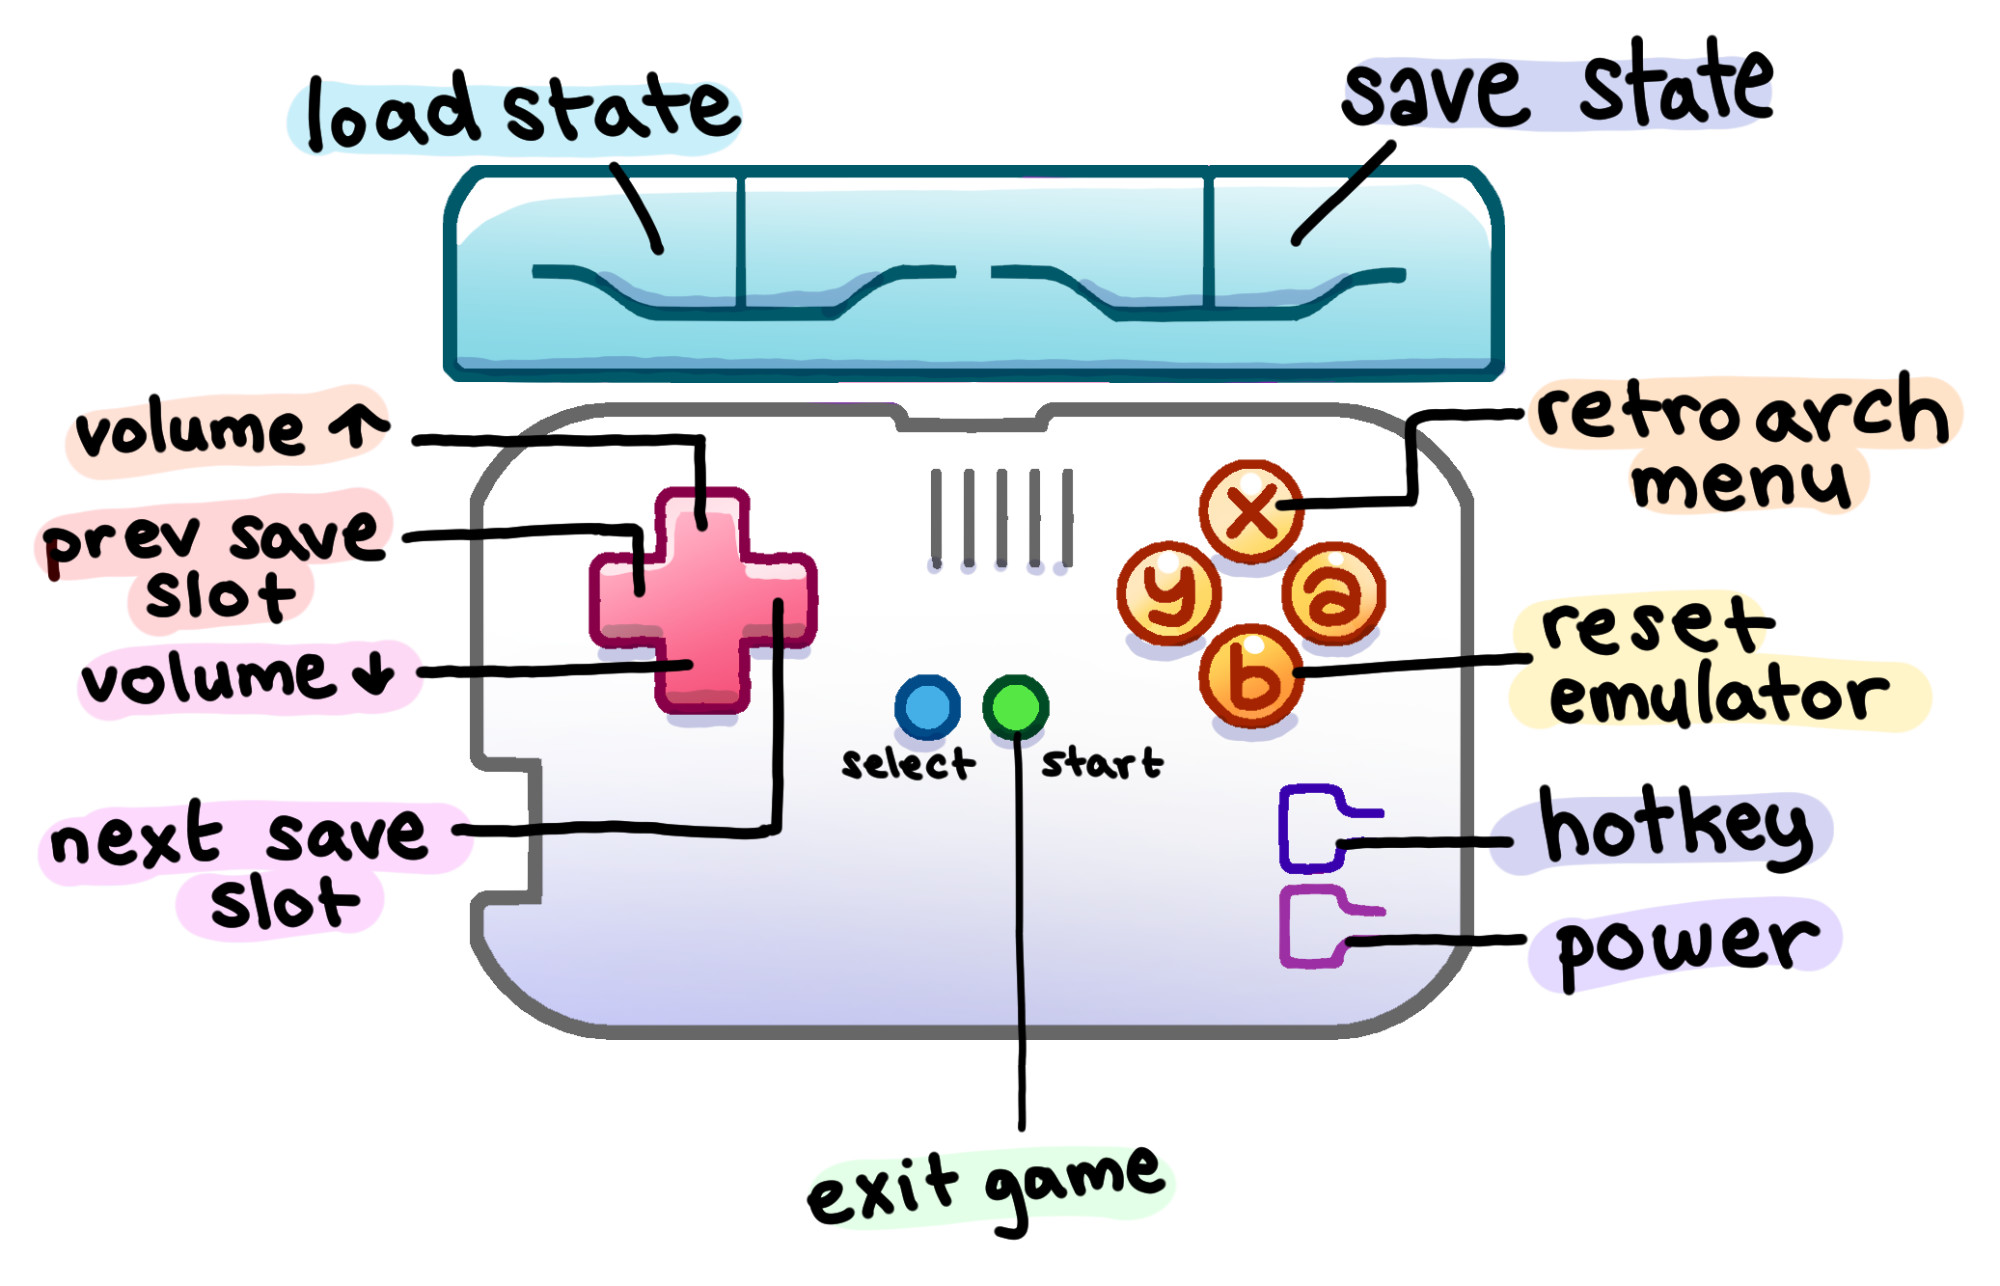
Pi Tin has a dedicated hotkey for RetroPie which is located directly above the power button. This button should be selected as “Hotkey Enable” during the controller setup process. The special functions shown below can be used by pressing the buttons while holding down the hotkey.
configure volume control
The volume control hotkeys must be set up after configuring the controller by manually editing the configuration file. Log in via SSH and run sudo nano "/opt/retropie/configs/all/retroarch/autoconfig/GPIOnext Joypad 1.cfg". Add these lines at the end of the file to enable volume control using the hotkey and press Ctrl+X, then Y, then Enter to save.
input_volume_up_axis = "-1"
input_volume_down_axis = "+1"
next steps
Once you have installed and configured RetroPie and verified that the hardware is working, continue to the final assembly guide for your build option.